Concealing Mistakes

With the decision to create breadboard ends made, the focus quickly turned to sourcing  material. As I’ve lamented in the past, my part of Cleveland is a bit of a hardwood desert. I only needed one 6″ wide x 48″ long of 8/4 walnut but this meant either driving 45 minutes to pay Woodcraft prices or 120 minutes to get out into God’s country for better options. I couldn’t justify 4 – 5 hours round trip for one board. Therefore, I called Woodcraft, said a brief prayer to the God of Walnut Color Variation, and drove over with an off cut from the top. Oh, I grabbed some Vaseline too (it came in handy). I lucked out on the color and grain, forked over $100, and left with one six foot long board about 6″ wide. Sigh…

On the drive home I continued contemplating my method for creating the breadboard ends. Previously, I used my Festool Domino to make this joint. The method is a slightly modified version of what’s shown in this video.  This joint has held up fine, but the long drive helped feed my neurosis and I didn’t want to chance this joint self destructing on a piece I will look at for years to come. Therefore, I broke out a few books on the topic  and decided on the more traditional method. I finally settled on this Glenn Huey video I’d watched many, many times.

Although a staunch an anti-jigist, I dove into the scrap bin and created the router fence Glenn describes to use with a flush trim bit. Once it was locked down into location, it was pretty straightforward and messy.

The plan called for a slight offset using a spacer. You run the flush trim bit to get the full length 1/4″ tongue. Also, I used my best judgment on spacing of the tenons. In the end, I mostly eye-balled it since this will be buried for eternity.

With the tenons made, I moved onto the mortises. The first step is to plow the groove for the 1/4″ tongue. Although I complain about my hardwood desert status, one of the advantages to living in Cleveland is the proximity to Woodpeckers. More specifically, the key advantage is being good friends with one of the designers who invent and create their one-time tools, like this one.

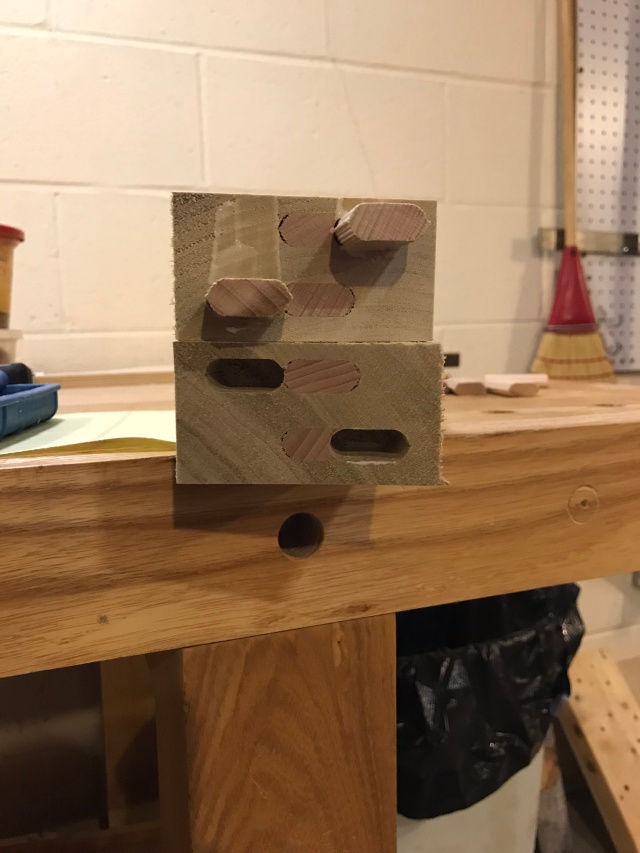
With groove properly fit, I marked the location of the mortises. Note in the pictures that I over cut them in length to help with assembly.

Next I fine tuned the fit with a rabbeting block plane, rasps, and a bed float.

The last step was to drill holes for drawboring the joint together. You’ll see clamps in the images, which I used for extra insurance and because they were easy to apply due to my design.

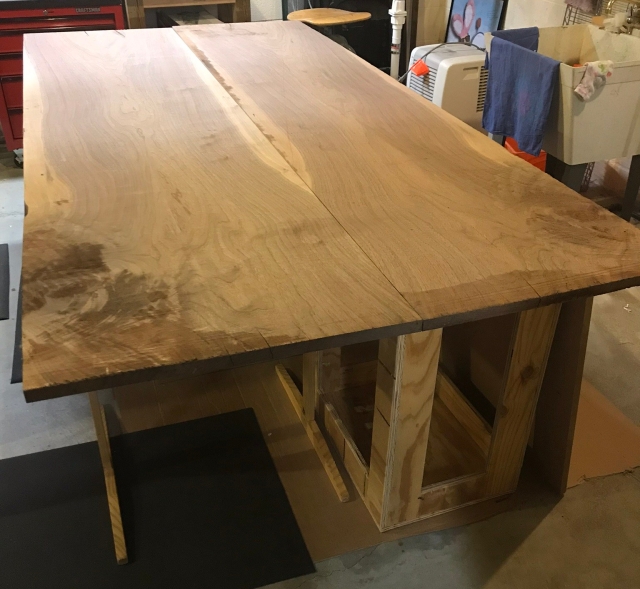
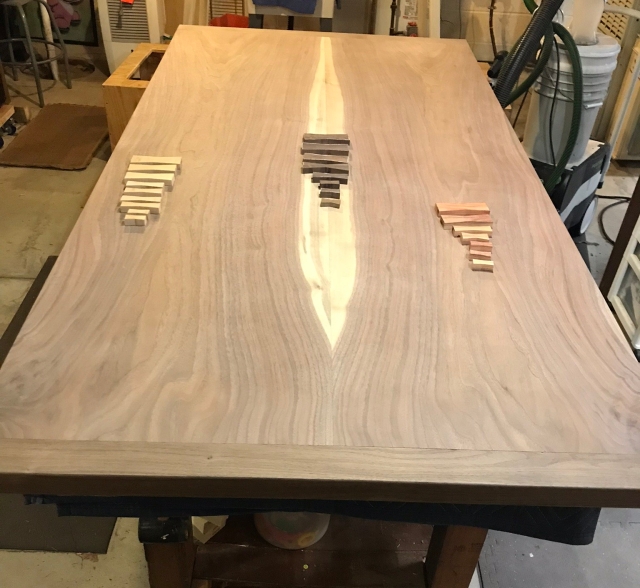
You might ask yourself why drilled the holes from the underside of the table. The reason being I didn’t want them to show on the top because I originally planned for decorative butterfly keys on the top. I thought the pegs would fight with the nice keys I’d made. However, after posting the picture below to Instagram, and thinking things through, I opted to nix that idea. The clean look of the top didn’t need any more mucking up.

img_0406.jpg

The only things left are applying the finish(s) and finalizing the mounting scheme. That’s for next time.

Posted in Dining Table, Home Improvement | Tagged , , , | 4 Comments

Failure & Wisdom

With the two huge slabs sufficiently flat, I was eager to apply glue and bust out the long clamps. Fortunately, my beard accumulated a touch more gray since my last large panel glue up. Therefore, I spent a full night’s time (typically 90 minutes for me) carefully jointing, checking, heaving, jointing, checking, and heaving again the slabs’ mating edges. I paid special attention to the gap and the exact grain match of the sap wood. I knew I’d be looking at this joint for many decades and the last thing I want to stare at during Sunday Sauce is an unsightly seam. One helpful note if you decide to glue up somethings this wide is to alternate the clamps. I normally don’t worry about this but I had a helluva time keeping the panel from warping at first. Then I reversed the long parallel clamps from the top to the bottom and everything flattened out.

Now came the “innovative” portion of the project: the “bookmatching” of the side profiles and the end grain. Reference the previous post for details but I’ll try to explain it in pictures as well. I’d already made cuts 1 and 2 on the sides and set them aside. With the top glued up I could use the final dimensions to make cuts 3 and 4.

With lots of clamps and lots of glue I used the cabinetmakers triangles to line up the pieces on the end grain.

At this point, I feared my original plan wasn’t going to work out. But I kept chugging along by removing a tiny bit of the bottom end pieces to make room for the entire side pieces (cuts 1 and 2) I’d removed previously. I knew in my heart though, this plan was doomed.

I never anticipated the four “quadrants” created by the end grain – especially when viewed from either end of the table. I thought they’d meet up a lot better but they didn’t. I’ve created the illustration below to try and explain because I just realized I never got a picture of this during the build (Freud would insert something about my subconscious or childhood here). It was one of those times that you just walk out of the shop because you realized you needed to hit the drawing board again.

Slide1

When I removed the clamps and cleared my head I tried to focus on the positive: the sides looked fabulous (you’ll see a picture in a future post). The joint was tight and the gain match was spot on. But I knew I couldn’t look at the janky ends any more than I could look at an crappy center seam. Breadboards would look good so I set off to review some designs and made a trip to the lumber yard for 8/4 walnut. That’s where we’ll pick up next time.

Posted in Dining Table, Home Improvement, Uncategorized | Tagged , , , , , , | 2 Comments

Properly Built Dining Tables Start With Large Televisions

Where were we? The base was done but the top needed attention.

Nature did most of the heavy lifting on the tabletop. I just needed to position the grain correctly and concentrate on tight joinery. The only downside of these gorgeous slabs was their thickness: at only 13/16′ or so, I needed some creativity to beef up the profile look. The boards just didn’t look weighty enough to marry with the base. After much contemplation, I devised the scheme below. I’d take advantage of the boards being 8′ long and 24″ wide. We clearly didn’t need (nor could we fit) an 8′ long, 48″ wide table. This meant I could use the extra length and width to trick the eye.

slide11.jpeg

By making cuts as described above I could create a side profile “bookmatch” and an end grain “bookmatch” on the ends (spoiler alert: the end grain bookmatch was a bust but the side profile was perfect). With the plan in place, I just needed to know how much to trim during Cut(s) 1. So, using the box from a big screen TV, I mocked up the final size and placed it on our existing dining table. With dimensions in hand I took a red lumber crayon to the wood marking triangles so I knew how to put it back together for the bookmatch.

After  installing a new rip blade for my tracksaw, and lots of flipping these massive boards back and forth, I knew all my head scratching had paid off.

img_0085.jpg

Now I had to get a little bit of twist out of the two boards. I started with a new Lie-Nielsen “8 and the longer workbench I made for our community shop several years ago.

With one side flat (or so I thought), I contacted the community member who operates our CNC. Before you take away my hand tool card, hear me out. Some of the grain was quite gnarly, which makes for a pretty face but difficult planing. Here’s what it looked like on the CNC table.

Although the CNC made short work of flattening, it also caused a problem. My initial hand planing hadn’t been as precise as I’d like. I think the Naked Workbench (i.e. 2×12’s right off the rack from Lowes) design hurt me a bit here. You see, like Mike Siemsen recommended, I never flattened the bench; I just wanted to get to the good stuff. Fast forward 2 – 3 years later, and my reference service wasn’t flat at all. Therefore, although my winding sticks appeared to be coplanar, there was still quite a bit of twist in one of the boards. This cause a slight misalignment when we flipped the board around on the table. The second board came out perfectly because we clamped it down to the CNC surface very tightly. I had to go back to the hand planes anyway to remove the 1/16″ discrepancy you see in the final picture. Lesson learned.

In the next post I’ll go into the details of gluing up the top and beefing up the visual weight.

Posted in Dining Table, Home Improvement, The Big Reno | Tagged , , , , , , , , , , | 1 Comment

All About That Base – Part II

With the base’s side assemblies glued up, I turned my attention to the top and bottom stretchers. Using the material on hand, I took the following approach: First, I oriented the top stretchers so the side grain faced up. This made the top stretcher assembly more like an I-beam and adds tremendous rigidity. Second, I turned the bottom stretcher so the long grain faced up. This adds a slight amount of flex but it adds visual weight to the bottom, where it’s needed. I did this by gluing a few boards together. You can see in the images below that I was pushing the limits of the table saw to get the angled cuts. I cut the bottom first and then snuck up on the final length of the top pieces (hence, why they are clamped together).

At this point I had angled side assemblies, angled top stretchers, and angled bottom stretchers. I was suffering from angle madness to be sure. But during this stage of the project I was pretty familiar with the correct orientation of the domino relative to the orientation of the mortises. The bottom was pretty straightforward 30 mm plunges on the side assembly and 70 mm plunges into the stretcher.

One thing I found useful was to listen for the “click” of the stop pins. As you tilt the fence relative to the angle of your workpiece, the stop pins will make an audible click when fence and workpiece are perpendicular. This works when the angle is obtuse relative to the reference face of the work. When the angle is acute I was able to get away with plunging at 90°. Simply put, don’t over think it. Just make some test cuts and you’ll figure it out.


With all dominoes installed I did a test fit. It seemed pretty rock solid, but I’m a belt and suspenders guy. So I took some off cuts and made internal bracing for the top assembly. Then I busted out the glue and long, long clamps. I also used several angled scraps to keep clamp pressure in the right spot.

Finally, I pinned the joints with homemade dowels.

Visually, I’m quite pleased with the final result. Hopefully it’ll mate well with the top and stay rigid for years to come.

Posted in Dining Table | Tagged , , , , , , | 5 Comments

All About That Base – Part I

A quick recap of the last post: indecision, base troubles, insomnia, eureka.

IMG_0168

Modern slab table from Nick Offerman’s Good Clean Fun

As I was saying… I didn’t like the way the base splayed-up (for a lack of better terminology) in Offerman’s book. It’s ok. And if I had a client ask me to make it that way, I would. For me though, I needed to turn the base upside down. This adds visual heft to the bottom where it, and least for me, belongs. With the plan set I got started on the head scratching experiences of angled joinery. I set my sights on using the Festool Domino (both large and small). I have the smaller version, and fortunately for me, I borrowed the larger one from my friend Brian. Using these tools are a dream but getting my head around angles called for practice joints and missteps.

The first step was to set my bevel gauge for 7 (ish) degrees. I kept this angle throughout the build, which deviates slightly from the plans in the book. From there I cut parts at the miter saw and roughly laid everything out on the table to see if it looked right.

With the initial sniff test over, I did some research on angles with the Domino. Truthfully, there is little out there on this topic. I kept running into the same 2 or 3 articles and videos. For these end pieces I used the small Domino and made tick marks. Then I lined up the Domino perpendicular to both sides of the joint. This makes for an angled tenon, especially after you glue it in to the end grain of the angled uprights. I set the upright mortise for the tight setting and the ones on the opposing face for the looser setting. This gave me some wiggle room. I posted the pictures below to Instagram to ask for advice if anyone had trepidation regarding the spacing of this joint.

Several commenters suggested adding lateral offset to the tenons to help with racking. After I got things together, I agreed since I experienced a slight amount of unsureness when I twisted the pieces a bit.  To remedy everything, I glued in dominos, let them cure, and flush trimmed the exposed ends. Then I recut everything as shown below.

IMG_0216

The recut mortise (tight setting) on the angled uprights

I dry fit everything. Feeling confident, I cleaned up the inside faces with a hand plane, added glue and used the offcuts to make the clamp up easier. Seriously, hold on to these things; they saved my bacon on several occasions during this build.

After taking these out of the clamps, I setup the table saw to make the angled cuts on the top and bottoms of these assemblies. The cutting was really easy but the thinking was not. I double and triple checked which side was what.

In the end, the cuts were perfect. In the next post I’ll go into detail regarding the stretchers and the growing pains of more angled joinery.


Posted in Dining Table | Tagged , , , , , , | Leave a comment

A Base to Successful Marriages

My wife asks for few things. Very few things. In fact, on the subject of furniture projects, she has only asked for one thing: a dining room table. Two years ago (technically it’s closer to three – ref. The Big Reno), we agreed to let the contractors do the vast majority of the project but we’d put our mark on the final touches. One of those final touches was to build a table to share both our family meals and holiday celebrations. My mind began to tackle this in earnest.

With the construction chaos at it’s peak, I dragged my on-her-way-to-sainthood wife to my favorite lumber yard (about an hour away) to make sure she liked the look of these two massive 24″ walnut slabs I’d spotted about a year prior. The photo below is from an older post (circa July 2014) and shows one of the two 8′ long slabs from the same tree.

8′ x 24″ piece of choice walnut

She said she liked them well enough and helped me put them into the van. She also helped me schlep them into the basement to acclimate. By the time October 2017 rolled around, I knew they’d acclimated long enough. That’s when I uncovered them from the bottom of the wood pile and started planning my first cuts.

But before I get to that I want to explain myself. Despite all the normal excuses like other projects, work, family life, etc., my delay wasn’t caused by any of those reasons. The walnut had spoken to me and although the top was going to be challenging, it was simply going to feature these two gorgeous works of nature. My major hang up stemmed from an inability to figured out the table’s base configuration. It sounds crazy but it’s completely true. I struggled for months on end to convey what I wanted. I took a design class with George Walker, sketched poorly but often, sought professional advice (thanks Tom), took endless pictures, and scoured Pinterest.

My wife, unlike me, is a deeply visual learner. She needs to see things laid out in their final configuration to fully grasp and make a decision. She is also quite exacting, which puts me in a quandary because I’m a broad-brush, it-looks-close-enough sort of person. I felt stuck until a conversation with my buddy Brian a few months ago. He knew I was planning to use painted poplar for the base. While lamented to him about my analysis paralysis he said something to the effect of “do you think the world is running out of primo 8/4 poplar?” I laughed and immediately felt the weight of this design lift off my chest. Later that night I told my wife I was just going to build the base and if we hated it I’d just burn it and make a new one. We’d only be out about $75. #perspective

Shortly after this freeing experience I made the first few cuts on the top and sectioned out the base components into a rough configuration. Around the same time, I was unfortunately confronted with a bought of mild insomnia. While trying to put myself to sleep, I grabbed the book on my night stand. It was Nick Offerman’s latest book Good Clean Fun. Toward the end there is a modern slab table whose based jumped off the page. Now, this did nothing for my ability to fall asleep, but it did give me a moment of complete clarity. All the pieces came together and I knew what to do next.

IMG_0168

Modern slab table from Nick Offerman’s Good Clean Fun

Stay tuned.

Posted in Dining Table | Tagged , , , , , , | 7 Comments

The Student(s) and the Teacher(s)

Last Christmas my daughter received a Youtube gift package from me. Well, me and her two favorite Youtubers: Bob Claggett and April Wilkerson. It had stickers and pencils along with a really cool note from Bob. This meant she needed a place to put the stickers. Coincidentally, she also needed a place to store some of her tools. I knew just the project: a modified version of this Japanese toolbox built by Chris Schwarz a few years ago.

I longed for connections on multiple levels. On one level, I wanted my daughter to do most of the building. On another, I elected to use scrap wood to instill the need to be thrifty and thoughtful in our selections. The first source of wood my daughter found on a walk back from the bus stop; a neighbor had tossed out some nice poplar from a built in bookcase. She asked why someone would throw out perfectly good wood [my heart grew three sizes]. The second source came from dismantling one of my first woodworking projects: an ill-fitted toolbox I made for my mom shortly after my dad passed. With my mom moving out of the home she’d raised us in after 50 years, I knew she no longer needed this functional, sentimental item. The layers were brooding nicely.

IMG_1098

The starting point

The plans were straight forward but I didn’t want the finickiness of finger joints so I went with rabbets and cut nails. This way I could do the joinery quickly and then have my daughter bang things together. I have little experience with the router table so it was great to use the one at my community shop. It made the joints easy and accurate.

I milled up the rest of the parts and then sanded them to 150 grit. This was perfect prep for the Gypsy Pink milk paint from Real Milk Paint Co. With things painted, we started doing the joinery. We used a practice box to get the feel of driving in nails and then went on to the real thing. We even got to bust out an egg beater drill I found in my grandfather’s basement before we moved him out of his house (read: layers, baby).

The box was built and ready for the lid. I wanted to impart a lesson on design and asked if she would like to make the lid a bit flashier. I had some extra maple from the drawer sides of her dresser and knew they’d add pizzaz. Unfortunately, the board was juuuust a bit small to cover the entire opening. I explained we only needed about ¼” of material to fit the lid and use this as another design opportunity. She really likes purpleheart so I glued up a panel with a racing stripe.

And there the box sat for a while. She lost interest and I didn’t want to push things. Inspiration struck while we were out at Sherwin Williams. She saw this display and wanted to know if we could buy some stain. I didn’t know this but they can mix up any color on the display using a base formula. Plus, it was only $8 for a quart. Score.

Again, the project sat for a few weeks and she didn’t want to work on it. I finally asked her if she just wanted me to finish it and she said yes. Her sister offered to help with the stain and I put everything together on my own one afternoon.

When it was all done she immediately got out her stickers and started putting her tools in it. She also gave me a big hug. The box has been completed for two months and she asks to go into the shop constantly. I’m glad I let her dictate the pace and I’m also glad I finished it for her. At the time I was a little disappointed she didn’t do more of the “work” herself. But upon reflection, I realized she was teaching me a lesson in patience and restraint. You gotta love the layers.

Posted in General Philosophy, Kids Furniture | Tagged , , , , , , | 2 Comments

Winds of Change

I know. It’s been a while…

Since my last post, I’ve made two trips to Florida, quit my job, started another one, and finished a few woodworking projects – including this one that made it’s way to the PopWood blog. Obviously, there’s been a lot more but I’m just hitting the high notes. This new job puts me on the road a bit more, which could be good for the blog (because I’ll have more time to post), or bad for the blog (because I’ll have less time to build). I’m not sure yet.  We’ll just have to see.

To get the juices flowing, and in keeping with the season, here are pictures of the pumpkins I started last fall but never got around to painting. They’ve been adorning the front yard for about an month and look much better than they would not decomposing in a landfill. I’ve been trying to up my game in the milk paint/finishing department. I scoured Pinterest and found this helpful article.  I know some thumb their noses at projects like this because they are not “fine” woodworking. Whatevs. I like color, I like painting, and I actually like the shabby chic look. Plus my daughters wanted decorations in the front yard so this was way better than buying something.

The pumpkins sat in the basement for about a week as I tried to rig up some complicated contraption (like a folding triangular stand using butt hinges and stakes) to stand them up and make sure they didn’t topple over. Then I recalled Occam’s Razor:

The small pumpkins are simply leaning against their larger brethren. We had heavy winds a few days ago and the small ones fell over. To combat this issue I simply picked them up and lean them up again; problem solved.

Posted in General Philosophy, Kids Furniture | Tagged , , , , , , , , | 2 Comments

Wildflower Seed on the Sand and Stone

This summer has been filled with mental breaks as I gear up for my next big project: The Dining Room table. I spent some time with the girls and knocked out some stuff for the house and garden. This project started with a trip to Kencraft in Toledo, OH for a Make Something event; it ended with a sassafras plant stand and many lessons along the way.

IMG_1218

Sassafras shorts

During this build, I was lucky enough to have my 13 year old niece visiting from Florida. She stayed with us for six weeks and I experienced what it’s like to have an intelligent, funny, eager-to-learn teenager in the house. She required little more than a nod toward the basement, and the occasional long sleeve shirt (it’s much colder here after all), to get her interested in woodworking. She’s had a tougher go at it than most, but I trust she found a much needed respite both living with us and learning to build things. She was eager to complete various tasks and wasn’t afraid to ask questions when she needed.

Unlike most of my builds, this was straight from a Wood magazine plan . My subscription lapsed many, many years ago but this was a fun thing to crank out without too much struggle or design skills (hing: I’m saving those for the dining room table). I wanted something we could accomplish given her short time here. Here are some of the highlights.

One of my favorite aspects was getting a tiny glimpse into my future; or least I hope so. I had a work trip in the middle of this build. I left instructions for my niece to sand and paint the parts with my girls while I was gone. I was hoping to return from my trip ready to put things together, in the nice blue tone she’d chosen, but they were only half done. Oh well, it’s better than having to do all the work myself. This must be what it’s like to have teenage apprentices in the shop.

My niece wasn’t able to see the final construction but she has followed on Instagram. On my own, I drilled more holes, installed more screws, plugged more holes, and added a few coats of touch up after it was all together.

I top coated the milk paint with a new-to-me product: General Finishes 450. It works wonderfully and goes on easy. I installed the stand in the garden with some pots my wife made years ago. I’ve always loved the way they look but we missed the northern window for planting herbs. Next year. The finish has been holding up nice over the past few weeks in the sun and rain.

As I reflect on this project many things come to mind. The universe launched the Workshop of Our Own campaign while this build took place. Megan Fitzpatrick wrote these words of wisdom describing her thoughts regarding “separate nouns.” And outside our woodworking world, the political and social struggles continued to rage. These issues ring true to me. Few things hit home more than acknowledgement of my own privileges afforded me by the color of my skin and the bits swaying below my navel instead of above. Alas, I can only change the things around me. So to that end, I’m leaving for Florida soon to help my brother work on his new house and while I’m there, I’ll plant the seeds of a workshop for my niece.

Posted in General Philosophy, Kids Furniture, Uncategorized | Tagged , , , , , , , | 2 Comments

Two Each. Her Own.

In my brief tenure as a father, I’ve learned many lessons. One of the most crucial came shortly after our second daughter was born. I was concerned I would never love a second child as much as I loved the first. Even while being the very distant third (cough…11 years) in a three-child family, I never experienced this feeling first hand. My parents were, and mom still is, good at loving us without favoritism or inequality. But as month eight turned into nine I couldn’t rationalize the data: how did my parents do this? How could I pour the same amount of attention and love into a second child? The answers came the moment I saw her and during the first hours of her life: attention is finite and we’d have to manage it, but love is infinite and grows without effort or control. It’s one of my favorite lessons.

Shifting gears, I’ll let you in on another lesson: sometimes siblings need their own stuff. And when there is only one of something, like a cool outdoor chair, the results aren’t pretty. I fixed the chair problem just as the summer outdoor seating season started. You may recall a post about this last year regarding building a second Ana White kid’s adirondack chair.

I didn’t take any progress pictures after that post but I completed the build effort during the fall. I even had enough pine from the recycled shelves to make two chairs. I opted to experiment with General Finishes while chalk paint for one and Real Milk Paint (in Gypsy Pink) for my daughter – her choice obviously.  It’s hard to express into words how apropos “gypsy” is to my always-barefoot, free-spirited second child. But you’ll get the idea when you see the stencil she chose for decoration. We even got mommy in the shop to help us put on the finishing touches.

I wasn’t too impressed with the GF chalk paint as it acted more like latex and less like milk paint; especially in terms of running down vertical services. I say this in comparison to milk paint which doesn’t run (at least not much). But the real pain came with the top coat. In previous milk paint projects I’ve used GF polyacrylic as a top coat. I made a sample board and tested it with the same stuff I’d used before and got positive results. Unfortunately, after applying a coat to the real project the results looked awful. There was a milky white haze throughout.

I quickly jumped on the Wood Whisperer Guild facebook page and posted my dilemma. After some digging, I realized GF stopped making that version of polycrylic a few years ago even though my can was only about 18 months old to me. I was burned by really, really, old finish. I sanded with 320 grit as best I could and picked up a can of spray on Minwax polycrylic from the big box store. It’s not perfect but it’ll do. The lesson here is to get new finish more regularly and definitely pre finish parts as best as you can – especially on this type of build. With the plants and container garden flourishing I took these shots of the chairs.

I was thinking of selling the white chair but decided it’s best to just give it to my neighbor, who I mentioned in my last post.

IMG_1331

Here my girls are playing in the chairs with our neighbors during a Fourth of July get together

You’ll be happy to know it’s been a favorite of his two kids, which brings us full circle: he just bought the wood to build a second chair on his own. I hope he’ll ask for help at least once. I’ve been thinking it might be time to purchase him a copy of Nick Offerman’s latest book followed up by Schwarz’s seminal ATC if he takes the bait.

Posted in Kids Furniture, Three Season Room | Tagged , , , , , , | 2 Comments